
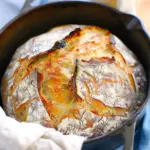
Dutch Oven No Knead Crusty Bread: The Ultimate Guide
Why is No Knead Bread a Game Changer for Young Professionals?
If you’re a busy young professional juggling deadlines, social outings, and perhaps even a new workout regimen, then the Dutch Oven No Knead Crusty Bread is about to become your new favorite kitchen ally. Why? Because this method is practically foolproof and requires minimal hands-on time, making it perfect for anyone with a packed schedule.
Imagine throwing together four simple ingredients—flour, water, salt, and yeast—and then letting them mingle for several hours, all without kneading. You can let the dough rise while you tackle that work project or binge-watch the latest series. The wait is a cinch compared to the rewarding, handcrafted crusty bread you’ll pull out of the oven, making it a delightful way to unwind after a long day.
Here are a few reasons why this recipe is a game changer:
- Time-Saving: Minimal active time allows you to multitask effectively.
- Cost-Effective: Baking your own bread at home is more budget-friendly than store-bought artisanal bread.
- Impressive Results: A crispy crust and fluffy interior make you look like a pro, even if you’re a beginner.
Plus, the Dutch Oven No Knead Crusty Bread offers the perfect opportunity to experiment with flavors. You can add herbs, spices, or even cheese to create your customized loaf. According to experts from the King Arthur Baking Company, homemade bread not only tastes better but also lets you control the ingredients, reducing additives and preservatives found in commercial versions.
And let’s talk about the aroma—when that loaf comes out of the oven, your kitchen will smell heavenly, instantly lifting your spirits. So next time you find yourself overwhelmed with work or responsibilities, consider setting aside a few minutes to prepare this simple dough.
Curious about how to get started? Check out our full recipe for step-by-step instructions on making your very own Dutch Oven No Knead Crusty Bread. Happy baking, and enjoy the delightful experience of creating something absolutely delicious with very little stress!
Ingredients for Dutch Oven No Knead Crusty Bread
Essential Ingredients for Perfect Bread
Creating Dutch Oven No Knead Crusty Bread is not just about following steps; it’s about choosing the right ingredients! Here’s what you’ll need:
- All-purpose flour (3 cups): This gives your bread a light, airy texture.
- Water (1.5 cups): Aim for lukewarm—this activates the yeast without killing it.
- Instant yeast (1/4 tsp): You want a reliable rise without waiting hours.
- Salt (2 tsp): For flavor, don’t skip this! Salt enhances the overall taste.
- Optional: Herbs or spices, like rosemary or garlic powder, for a personal touch.
Curious about how each ingredient works? Check out this guide on the science of baking to deepen your understanding!
Equipment You’ll Need
To get started on your Dutch Oven No Knead Crusty Bread, make sure you have the following on-hand:
- A large mixing bowl for combining your ingredients.
- A wooden spoon or spatula for stirring.
- Plastic wrap or a kitchen towel for covering the bowl while the dough rises.
- A Dutch oven (cast iron preferred) for creating that perfect crust.
With these essentials, you’ll be well on your way to baking like a pro! Remember, the right equipment not only simplifies the process but also enhances the end result. Happy baking!
Step-by-Step Preparation of Dutch Oven No Knead Crusty Bread
Making bread from scratch at home can feel a bit daunting, especially for those of us who busy ourselves with the hustle and bustle of the modern world. But let me tell you, there’s absolutely nothing like the aroma of freshly baked bread wafting through your home. With this Dutch Oven No Knead Crusty Bread recipe, you’ll discover that bread-making can be both straightforward and rewarding. Let’s dive right into the steps!
Combine Water, Yeast, and Salt
First things first, grab a mixing bowl and measure out 3 cups of lukewarm water (about 110°F). It should feel just warm to your touch, not hot. Sprinkle in 2 teaspoons of active dry yeast and 1.5 teaspoons of salt (sea salt works great). Give it a gentle stir to combine the ingredients. This mixture is crucial as it wakes the yeast up, a fundamental step in developing that amazing bread texture.
For a bit of extra flavor, consider adding a tablespoon of honey or a splash of olive oil. These ingredients can help to enrich your dough and provide a slight sweetness that beautifully complements the savory crust.
Add Flour and Form the Dough
Once your yeast has had a chance to activate—about 5-10 minutes—you can start adding flour. You’ll need 6-7 cups of all-purpose flour. I suggest adding 6 cups to start, and then evaluate how stickiness feels. Mix the flour into the wet ingredients until you have a shaggy dough. Don’t fret about the mess; it’s part of the charm. The dough will be quite sticky—embrace that, as that means your bread will turn out wonderfully chewy!
Let It Rise — Patience is Key
Now, cover that bowl with plastic wrap or a clean kitchen towel and let your dough rise for 12 to 18 hours at room temperature. The longer rise not only develops the flavor but also makes it easier to work with. I know waiting can be hard, but think of this as a perfect time to tackle your favorite Netflix show, or even prep some Turkey Bacon for breakfast tomorrow.
The dough is ready when you see bubbles forming and it has doubled in size. Your patience will definitely pay off with a crusty bread the neighborhood will be talking about!
Preheat Your Dutch Oven
About 30 minutes before you’re ready to bake your bread, preheat your oven to 450°F. Place your Dutch oven (with the lid on) into the oven as it heats. This will create a steamy environment for baking, resulting in that beautiful crust we’re all after.
Shape and Prep Your Loaf
After the dough has risen, it’s time to shape it. Lightly flour your work surface and gently turn out the dough, being careful not to deflate it too much. Fold the edges of the dough towards the center to shape it into a round loaf. Let it rest for about 15 minutes, then, using parchment paper, transfer the loaf onto it. This step will make the loaf easier to lift into the Dutch oven.
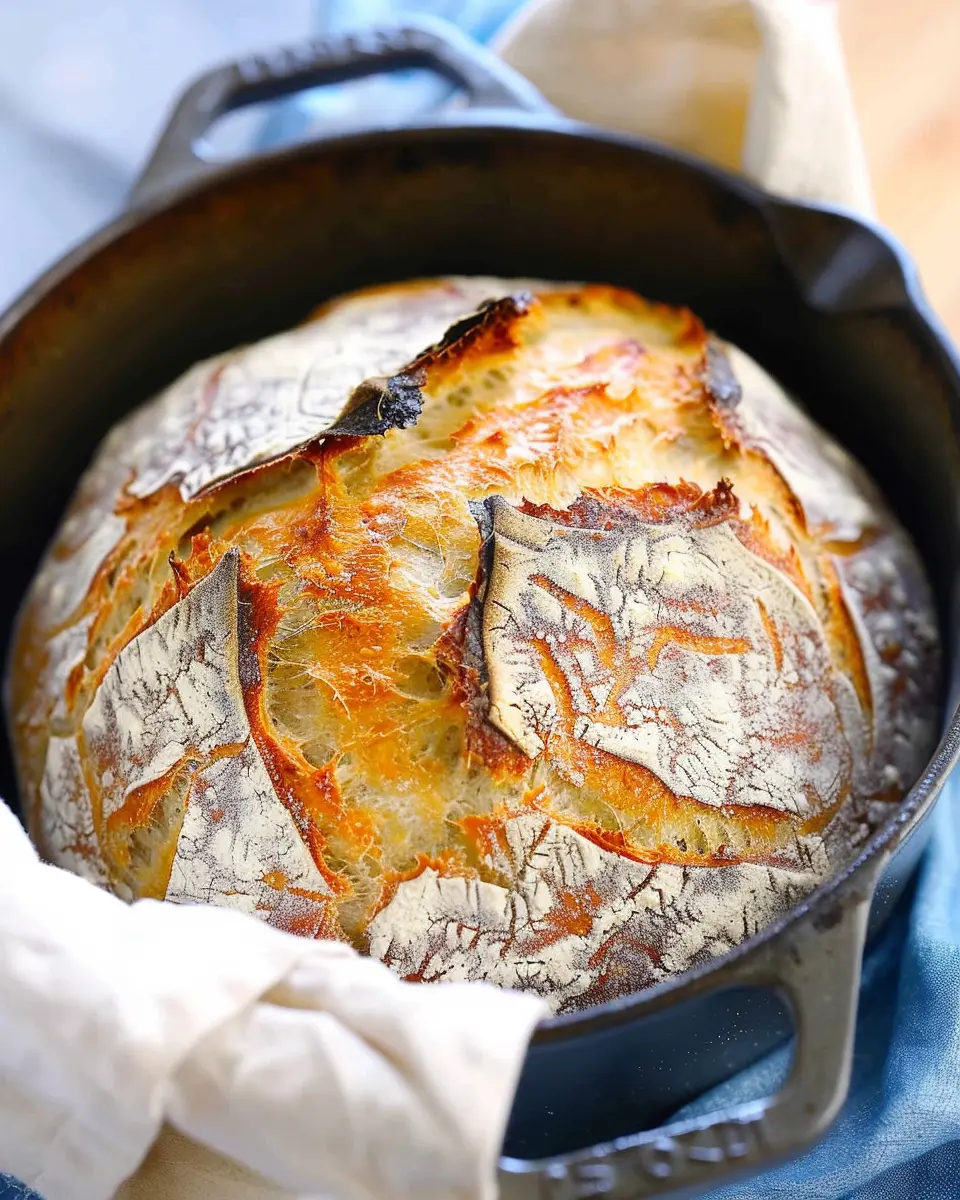
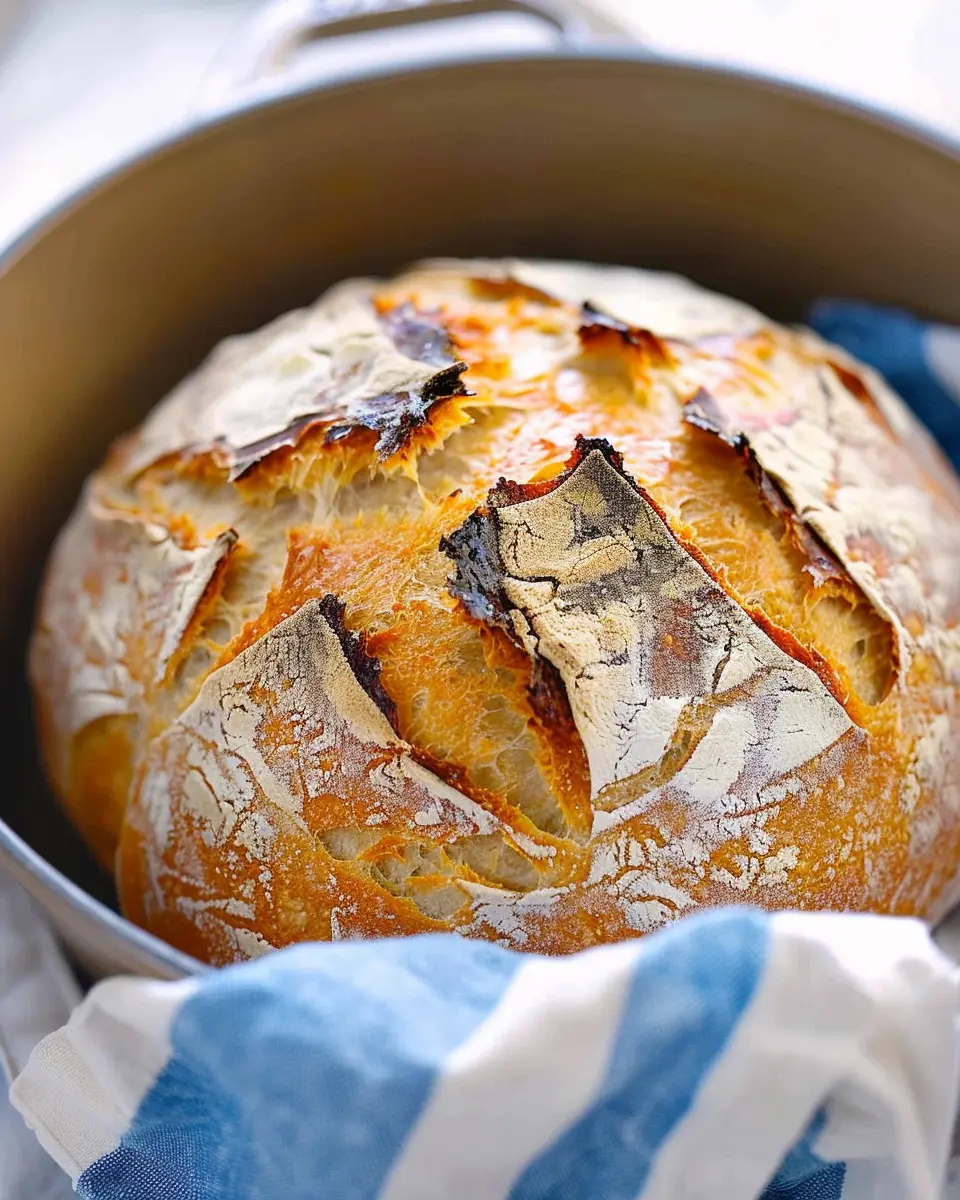
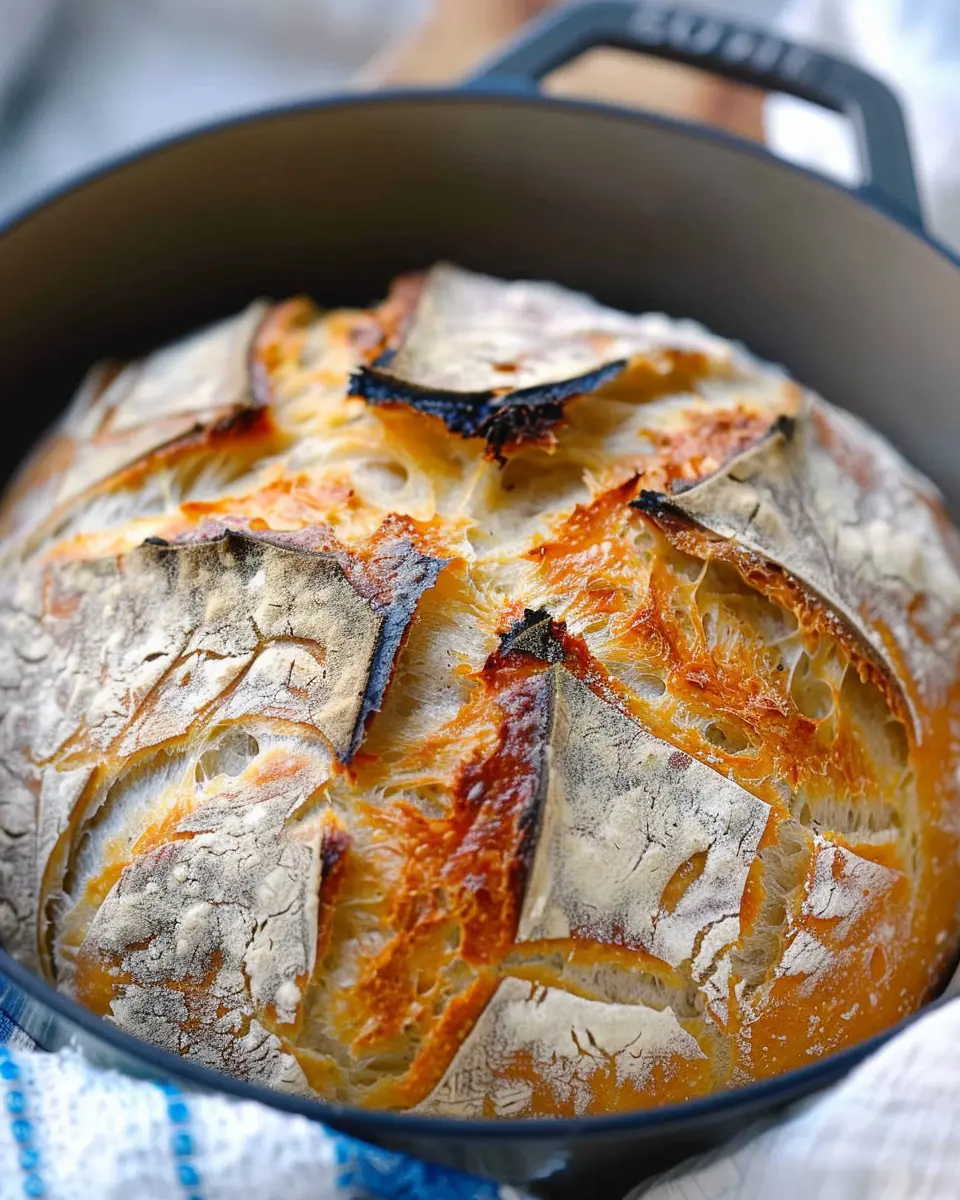
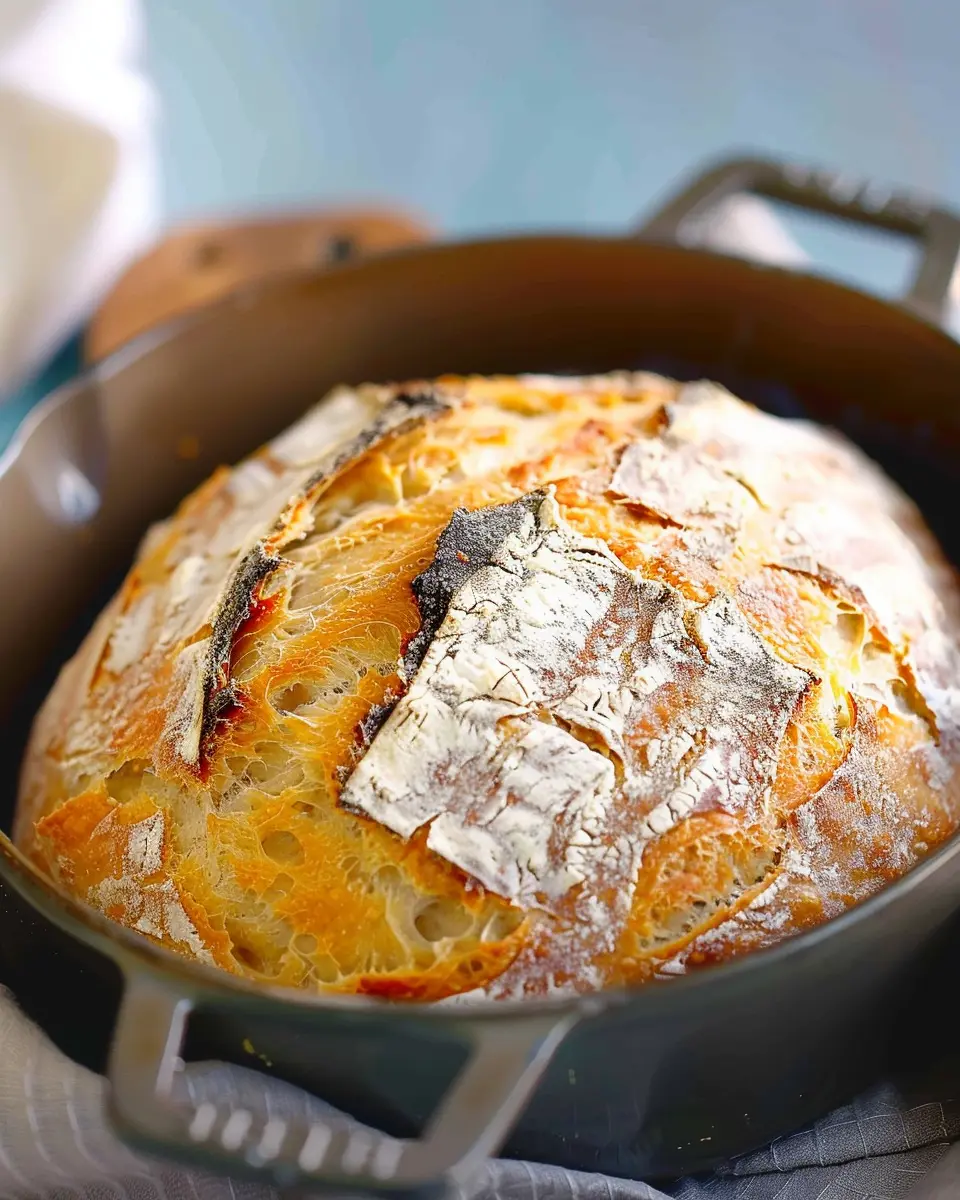
Bake for Crusty Perfection
Finally, with your oven nice and hot, remove the Dutch oven, and carefully lift your bread using the parchment paper. Place the whole thing back into the oven (lid on) and bake for the first 30 minutes. This is where the magic happens! After 30 minutes, remove the lid and let it bake for an additional 15-20 minutes until you get that gorgeous golden-brown crust.
Once done, be sure to let your bread cool on a wire rack before slicing. The crust should be crunchy, and the interior should be soft and airy—ideal for pairing with Chicken Ham or as a side for soups and salads. Enjoy the fruits of your labor and watch as your friends and family marvel over your new skill!
To learn more about perfecting your bread-making technique, check out The Bread Lab for some expert tips!
Variations on Dutch Oven No Knead Crusty Bread
Creating your own version of Dutch Oven No Knead Crusty Bread is not only straightforward but also incredibly fun! Let’s explore two delightful variations that can elevate your bread game and impress your friends at the next potluck.
Herb-Infused Crusty Bread
Imagine slicing into a loaf of bread that bursts with the aroma of fresh herbs. To create an herb-infused crusty bread, consider mixing in a blend of your favorite dried herbs like rosemary, thyme, and oregano into the dough. These aromatic additions will impart an incredible depth of flavor.
- Tip: Incorporate about 1 tablespoon of mixed herbs into your dry ingredients.
- Add garlic: If you’re a garlic lover, tossing in some minced garlic or garlic powder can create a delightful savory note.
If you want to learn more about the benefits of cooking with herbs, check out this article from the Culinary Institute of America for tips.
Cheese and Garlic Delight
For those who find it hard to resist cheesy goodness, this Dutch Oven No Knead Crusty Bread variation is for you! Stir in shredded cheese like sharp cheddar or mozzarella during the mixing stage. Not only will the bread have a wonderful texture, but it’ll also develop luscious pockets of melted cheese.
- Garlic infusion: Don’t bear back on the garlic—mix in 2 to 3 cloves of minced garlic for a delightfully fragrant experience.
- Serve with dips: This cheesy bread pairs beautifully with herbed olive oil or a zesty tomato salsa.
With these variations, your Dutch Oven No Knead Crusty Bread will not just be bread—it’ll be the star of the meal. So roll up your sleeves, let creativity take over, and enjoy the process!
Cooking Tips and Notes for Dutch Oven No Knead Crusty Bread
Troubleshooting Common Issues
Making Dutch Oven No Knead Crusty Bread is typically straightforward, but sometimes things don’t go as planned. If your bread isn’t rising, it may be due to old yeast. Ensure to check the expiration date and use active dry yeast. If the crust isn’t as crispy as you’d like, try baking it longer with the lid off for the last 10-15 minutes. And if you’ve ended up with a dense loaf—don’t worry! It happens to the best of us. You can adjust future recipes by ensuring adequate hydration in your dough; a wetter dough makes for a lighter bread.
Tips for Enhancing Flavor
Flavor is key in homemade bread. To elevate your Dutch Oven No Knead Crusty Bread, consider adding ingredients like fresh herbs, garlic, or even a splash of apple cider vinegar for depth. You might also try using a bit of whole wheat flour alongside all-purpose flour for a heartier texture and taste. And if you’re feeling adventurous, sprinkle in some cheese or olives during the mixing stage!
For even more flavor bonanzas, check out King Arthur Baking’s Flavor Boosters for expert tips. Happy baking!
Serving Suggestions for Dutch Oven No Knead Crusty Bread
Best Pairings for Your Fresh Bread
Bringing home a loaf of Dutch Oven No Knead Crusty Bread opens up a world of delicious pairing possibilities. Picture this: warm slices slathered with creamy butter, served alongside a steaming bowl of homemade chili or a hearty vegetable soup. The crispy crust and soft interior are the perfect complement to your favorite comfort foods.
If you’re feeling adventurous, why not try it with some Turkey Bacon and a sunny-side-up egg for a decadent breakfast? Cheese lovers can enjoy the bread with rich cheeses, like Brie or aged cheddar, for a delightful cheese board experience. And don’t forget dips! Hummus or tapenade makes for a delightful afternoon snack.
Creative Ways to Use Leftover Bread
Don’t let any part of your Dutch Oven No Knead Crusty Bread go to waste. Turn leftovers into delectable croutons by cubing them, tossing with olive oil, and roasting until golden. Need a breakfast idea? Blend stale bread into a strata with eggs and your choice of vegetables.
You could even make some delicious Chicken Ham sandwiches for lunch or prepare a comforting bread pudding as a sweet treat. For more ideas on using stale bread creatively, check out the tips from The Culinary Institute of America.
With a little creativity, your crusty bread can shine in various delicious ways!
Time Breakdown for Dutch Oven No Knead Crusty Bread
When it comes to making Dutch Oven No Knead Crusty Bread, understanding the time commitment can help set you up for success. Here’s a quick overview of the times you’ll be working with:
Preparation Time
Getting started is simple and quick! You’ll spend about 15-20 minutes combining your ingredients. It’s just flour, water, salt, and yeast—no fuss and no need for a fancy mixer!
Rising Time
Here’s where the magic happens. Once you’ve mixed your dough, let it rise for 12-18 hours. Yes, that might sound long, but it allows for a richer flavor and perfect texture. Perfect for planning ahead!
Baking Time
Finally, the moment arrives! Preheat your oven while the dough rests for an hour, and then bake for about 30-40 minutes. The steam from the Dutch oven creates that perfect crust we all love.
Now that you know the breakdown, you’re all set to start baking. For more inspiration, check out sites like King Arthur Baking for tips or Serious Eats for techniques that enhance your Dutch Oven No Knead Crusty Bread experience!
Nutritional Facts for Dutch Oven No Knead Crusty Bread
When you decide to bake Dutch Oven No Knead Crusty Bread, you’re not just indulging in a delicious treat — you’re also nourishing your body. Here’s a quick look at what’s in that crusty loaf you’re about to create.
Calories
A single slice of homemade Dutch Oven No Knead Crusty Bread typically contains around 80-100 calories. This can vary slightly depending on your specific ingredients and portion sizes.
Key Nutrients
- Carbohydrates: The primary source of energy, contributing to your daily energy needs.
- Protein: Each slice provides about 2-3 grams, helping with muscle repair and growth.
- Fiber: Important for digestion and usually present in whole grain flours.
- Minerals: Iron and calcium can be detected, especially if you use enriched flour.
Health Benefits of Homemade Bread
Making your own Dutch Oven No Knead Crusty Bread allows you to control the ingredients better than store-bought options. You can substitute with whole wheat flour for added nutrients or even add seeds and nuts. Homemade bread is often fresher, contains no preservatives, and provides a sense of satisfaction that only comes from crafting your own food. Plus, baking can be therapeutic!
If you want to dive deeper into the health benefits of homemade bread, check out resources from The Whole Grains Council for an extensive overview.
Baking your bread brings a sense of comfort and accomplishment — it’s like a warm hug on a plate!
FAQ About Dutch Oven No Knead Crusty Bread
What if my bread doesn’t rise?
If your Dutch Oven No Knead Crusty Bread doesn’t rise as expected, a few factors might be at play. First, check the age of your yeast—expired yeast is often the culprit. Secondly, ensure your dough was kept in a warm, draft-free place during fermentation. Consider using a spot like your oven with the light on. If all else fails and we’re in the realm of mystery, you can still bake it; it just may turn out denser. Remember that baking is as much art as it is science!
How do I store leftover bread?
Preserving the freshness of your Dutch Oven No Knead Crusty Bread is important to enjoying that crusty goodness later. Store it in a paper bag at room temperature for short-term preservation. If you plan to keep it longer, consider slicing it and freezing individual pieces. Just wrap them tightly in plastic wrap and place them in an airtight container. When you want a slice, you can take it out and toast it directly from the freezer—easy and delicious!
Can I make this bread gluten-free?
Absolutely! While crafting a gluten-free Dutch Oven No Knead Crusty Bread can be a bit tricky, it’s possible. You can experiment with gluten-free all-purpose flour blends, ensuring they contain xanthan gum for structure. Be mindful that the texture may differ slightly, but with the right adjustments, you can achieve a remarkable crusty loaf that’s satisfying to enjoy. For more specific tips, check out resources like Gluten-Free Baking.
Baking bread is all about discovery, so don’t be disheartened by missteps. Enjoy the journey and happy baking!
Conclusion on Dutch Oven No Knead Crusty Bread
If you’re looking to elevate your home baking game, Dutch Oven No Knead Crusty Bread is an absolute must-try. This method yields a beautifully rustic loaf with a crunchy crust and soft, airy interior that perfectly complements a variety of meals.
Imagine pairing this delectable bread with your favorite spreads or using it as the base for a mouthwatering sandwich featuring turkey bacon or chicken ham. What’s even better is that you can personalize it with different herbs or toppings to match your palate.
To wrap up, embrace the process and enjoy the aroma filling your kitchen. For more tips on baking techniques, check out sources like King Arthur Baking for additional inspiration. Happy baking!
PrintDutch Oven No Knead Crusty Bread: Easy Homemade Delight
Learn how to make delicious crusty bread effortlessly using a Dutch oven.
- Prep Time: 10 minutes
- Cook Time: 45 minutes
- Total Time: 18 hours 55 minutes
- Yield: 1 loaf
- Category: Bread
- Method: Baking
- Cuisine: American
- Diet: Vegetarian
Ingredients
- 3 cups all-purpose flour
- 1.5 teaspoons salt
- 1 teaspoon instant yeast
- 1.5 cups water
Instructions
- In a large bowl, mix the flour, salt, and yeast.
- Add the water and stir until a shaggy dough forms.
- Cover and let rise at room temperature for 12 to 18 hours.
- Preheat the oven to 450°F (232°C) with the Dutch oven inside.
- Carefully place the dough into the hot Dutch oven.
- Cover and bake for 30 minutes.
- Remove the lid and bake for an additional 15 minutes until golden brown.
- Let cool before slicing.
Notes
- For a more flavorful dough, consider using sourdough starter.
- Experiment with herbs and spices for added flavor.
Nutrition
- Serving Size: 1 slice
- Calories: 120
- Sugar: 0g
- Sodium: 300mg
- Fat: 0g
- Saturated Fat: 0g
- Unsaturated Fat: 0g
- Trans Fat: 0g
- Carbohydrates: 24g
- Fiber: 1g
- Protein: 4g
- Cholesterol: 0mg


")